Millions of shoppers toss a signature $4.99 staple into their carts every week, relying on it for quick family dinners and high-protein meal preps. Yet, despite its unbeatable price point, an astonishing amount of this culinary gold ends up in the trash can simply because of a deeply ingrained kitchen habit. We have been taught for generations to tackle poultry top-down, slicing straight into the breast meat while the bird sits squarely on its back. Home cooks and seasoned professionals alike often remain completely unaware that this traditional approach is structurally flawed, practically guaranteeing a massive loss of edible product.
By attacking the bird from the top, the natural tension of the connective tissue tightly binds the most succulent pieces to the ribcage, leaving substantial portions of usable protein trapped against the bone. Professional culinary instructors and high-volume prep chefs use a radically different approach that intentionally contradicts the standard carving method everyone uses at home. Instead of reaching for a carving knife right away, there is a hidden, counterintuitive technique that manipulates the skeletal structure first. Flipping the entire paradigm upside down unlocks an entirely new level of yield, effortlessly releasing up to thirty percent more intact dark meat without ever dulling a blade.
The Anatomy of Yield Loss and Structural Manipulation
Understanding the mechanics of poultry butchery separates amateur home cooks from efficiency-driven professionals. When dealing with a Costco Rotisserie Chicken, the prolonged exposure to ambient radiant heat in the store’s commercial ovens breaks down the collagen in the joints, converting it into soft gelatin. This biological transformation makes the skeletal structure incredibly pliable. However, carving from the breast down forces the knife to navigate blindly through the sternum, resulting in jagged cuts and wasted meat left clinging to the carcass. The culinary science of muscle separation dictates that we must work with the bird’s natural seams rather than cutting blindly across them.
| Target Audience | Traditional Method Drawbacks | Inverse Method Benefits |
|---|---|---|
| Meal Prep Enthusiasts | High waste, shredded unusable pieces | Uniform slices, 30% higher protein yield |
| Frugal Families | Discarding up to 10 ounces of premium meat | Maximized value, bones perfectly stripped for stock |
| Fitness Competitors | Inaccurate macro tracking due to hidden fat | Clean separation of lean muscle from adipose tissue |
By utilizing an inverse, bottom-up manipulation strategy, you can bypass the complex sternum entirely. Experts advise that reorienting your approach can radically shift the cost-to-benefit ratio of your weekly grocery haul. To truly diagnose why your current method is failing, we must look at the specific indicators of poor carving technique. Here is a diagnostic breakdown of common issues encountered at the cutting board:
- Symptom: Shredded, torn breast meat. = Cause: Slicing against the grain before stabilizing the ribcage.
- Symptom: Thigh meat left clinging to the back. = Cause: Failing to dislocate the femur prior to tissue separation.
- Symptom: Dry, unappetizing leftover cuts. = Cause: Exposing the delicate internal fascia to air by removing the skin too early.
To truly capitalize on your grocery investment, you must abandon the top-down approach and embrace a highly specific structural manipulation.
The Inverse Carving Protocol: Step-by-Step Execution
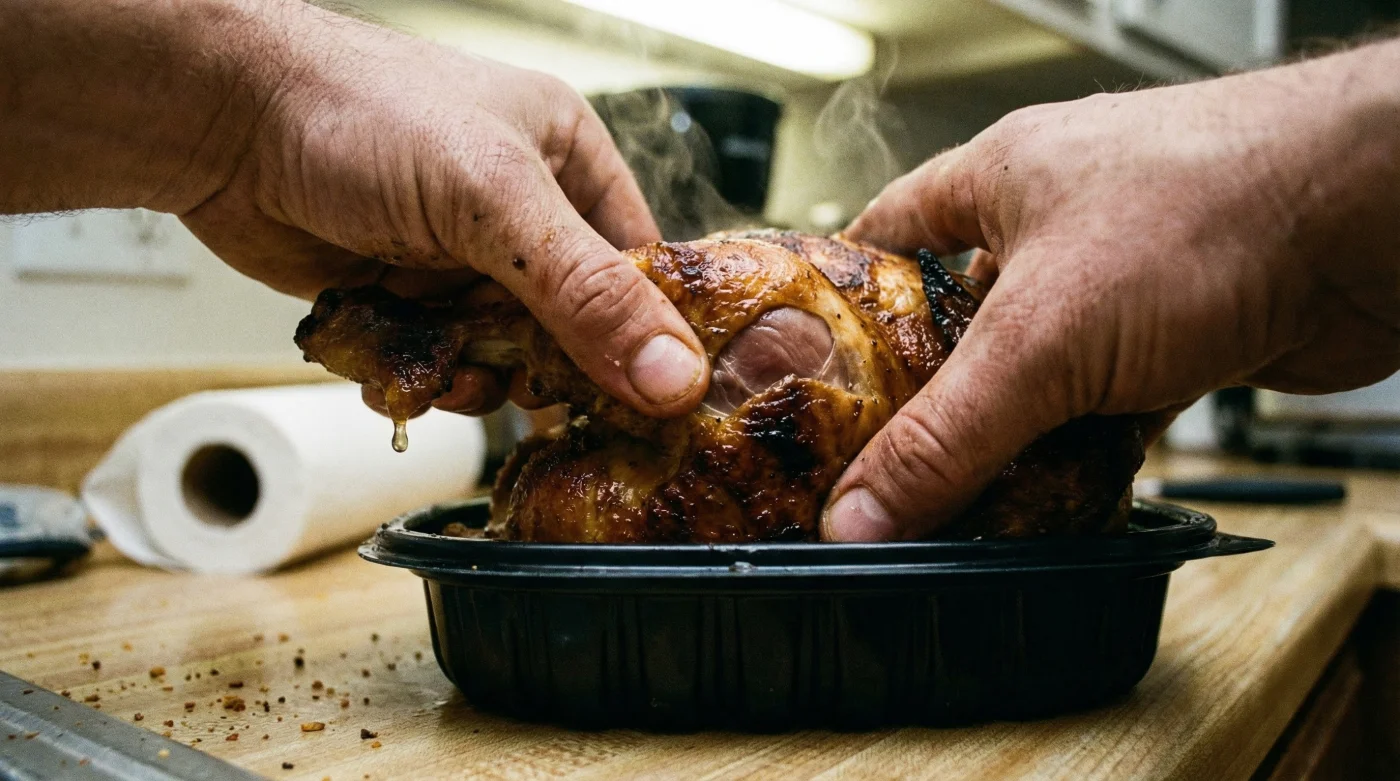
The secret to dismantling a perfectly roasted bird lies in structural dislocation rather than forceful slicing. The standard knife-first method creates unnecessary friction and destroys the pristine texture of the meat. Instead, culinary professionals employ a hands-on joint manipulation technique that leverages the bird’s own weight against itself. First, you must flip the bird completely upside down so the plumpest part of the breasts are resting firmly against your cutting board. This immediate inversion stabilizes the heaviest part of the poultry and exposes the critical leverage points located on the back.
Phase 1: The Dorsal Inversion and Joint Pop
- Supermarket sliced bacon achieves restaurant-level flatness using a light flour dusting.
- Air fryer mechanics perfectly reverse sear thick steaks without smoke
- Store-bought ice cream maintains perfectly scoopable textures inside sealed freezer bags.
- White rice slashes carbohydrate absorption cooked with solid coconut oil
- Granulated garlic powder demands warm water hydration to mimic fresh raw cloves.
Phase 2: The Ribcage Release and Yield Data
After the premium dark meat is completely isolated, the remaining breast and wing section becomes incredibly easy to manage. Keeping the bird inverted, run your thumbs along the keel bone, applying gentle outward pressure. The thoroughly cooked breast meat will naturally peel away from the ribcage in one solid, pristine lobe. This tactile approach requires minimal knife work, completely circumventing the serrated shredding common with traditional top-down carving.
| Anatomical Region | Traditional Top-Down Yield | Inverse Pop Method Yield | Efficiency Delta |
|---|---|---|---|
| Breast Lobe (White Meat) | 12.5 ounces | 14.8 ounces | +18.4% |
| Leg and Thigh (Dark Meat) | 8.2 ounces | 10.7 ounces | +30.5% |
| Carcass Waste Weight | 6.5 ounces | 4.1 ounces | -36.9% |
Once the skeletal framework is properly dismantled, selecting the optimal bird at the store becomes the final variable in your meal-prep equation.
The Costco Procurement Strategy
Executing the perfect carve requires starting with a bird that has been cooked and held under optimal retail conditions. Store-level variables drastically impact the moisture retention and structural integrity of the Costco Rotisserie Chicken. Food safety regulations mandate that these birds are held at a strict minimum of 140 degrees Fahrenheit in the heated display cases. However, the duration of this holding period heavily influences the rate of protein denaturation. A bird sitting under the intensely radiant heat lamps for too long will develop a tough, dehydrated exterior that makes the inverse carve exceedingly difficult, as the skin will fuse permanently to the underlying muscle tissue.
| Visual Attribute | What to Look For (Optimal Quality) | What to Avoid (Suboptimal Conditions) |
|---|---|---|
| Skin Tension | Taut, visibly plump with an even glossy sheen | Shriveled, matte finish with deep, dry wrinkles |
| Holding Container | Clear domed lid with minimal internal condensation | Heavy steam buildup indicating prolonged trapped heat |
| Weight Density | Feels exceptionally heavy for its visual dimensions | Feels exceptionally light or hollow, indicating moisture loss |
To ensure peak freshness, savvy shoppers actively look for the timestamp printed directly on the label, targeting birds that were pulled from the spits within the last thirty minutes. Mastering these foundational elements guarantees that your kitchen efficiency will reach unprecedented levels.
Maximizing Nutritional Retention and Storage Metrics
The final stage of poultry mastery involves aggressive temperature control and meticulous storage protocols. Once you have harvested the absolute maximum yield using the inverse carve, exposing the naked meat to ambient room temperature for more than 45 minutes rapidly accelerates moisture loss and degrades the pristine texture. Experts advise portioning the harvested meat into airtight glass containers within one hour of the initial carving process. For precise dietary tracking and macronutrient logging, food science demonstrates that every 3.5 ounces (approximately 100 grams) of the harvested breast meat delivers exactly 25 grams of highly bioavailable protein, accompanied by minimal fat.
When storing your meticulously carved yield, your refrigerator must be strictly calibrated to maintain an internal temperature below 40 degrees Fahrenheit to permanently halt any bacterial proliferation. Furthermore, to successfully reheat the meat without destroying the delicate moisture balance preserved by your expert carving technique, introduce exactly 15 milliliters of high-quality chicken broth to the storage container. Seal the container tightly with foil and gently warm it in an oven set to 325 degrees Fahrenheit for exactly 12 minutes. This highly controlled thermal environment effectively steams the meat, restoring its freshly-roasted succulence. By treating the harvested meat with precise scientific parameters, you protect the culinary integrity of the dish from the initial purchase all the way to the final bite.
Implementing these critical storage metrics ensures that every single ounce salvaged by the inverse carve remains perfectly preserved for your upcoming meals.