You hear that familiar pop of the vacuum seal, followed by the immediate sight of a golden pool of oil resting ominously at the top of the glass. You know what comes next. You reach for the longest, sturdiest butter knife in your silverware drawer, bracing your shoulder for the inevitable struggle. The first plunge displaces the liquid, sending a slick, greasy waterfall cascading down the sides of the jar and onto your clean countertops.
This is the universally accepted ritual of consuming natural peanut butter. You drag the dull blade through the dense, impenetrable peanut cement at the bottom, desperately trying to fold the stubborn solids back into the liquid fat. It is an exhausting, messy chore that rarely yields a perfectly uniform spread, leaving you with a runny mess at the top and dry crumbles weeks later at the base.
But what if the manual stirring we all accept as mandatory is completely backwards? The commercial food industry abandoned the butter knife decades ago, not by changing the ingredients, but by changing the mechanics of the blend. You do not need a stronger arm or a special stirring crank. You only need to rethink the physics of the jar sitting in front of you.
The secret lies in swapping your utensil for the appliance hiding in your kitchen cabinet. By introducing rapid mechanical shearing force into the jar, you can permanently bind the separated molecules in a matter of seconds. No oil slicks on the counter, no wrist fatigue, and no dry sediment at the bottom.
The Physics Behind The Peanut Emulsion
To understand why the butter knife fails, you must understand what happens when peanuts are ground into paste. The mechanical crushing releases the natural fats from the cellular structure of the legume. Because natural brands skip the hydrogenated oils that act as artificial stabilizers, gravity eventually pulls the heavier solids down while the lighter oils float upward. You are looking at a broken emulsion.
When you attempt to fix this with a spoon or knife, you are merely pushing large clumps of peanut protein around in a pool of fat. You are relying on clumsy, macro-level agitation to do the job of a molecular binder. The oil simply slips around the solids rather than integrating into them. It is like trying to merge sand and water by slowly dragging a stick through a bucket.
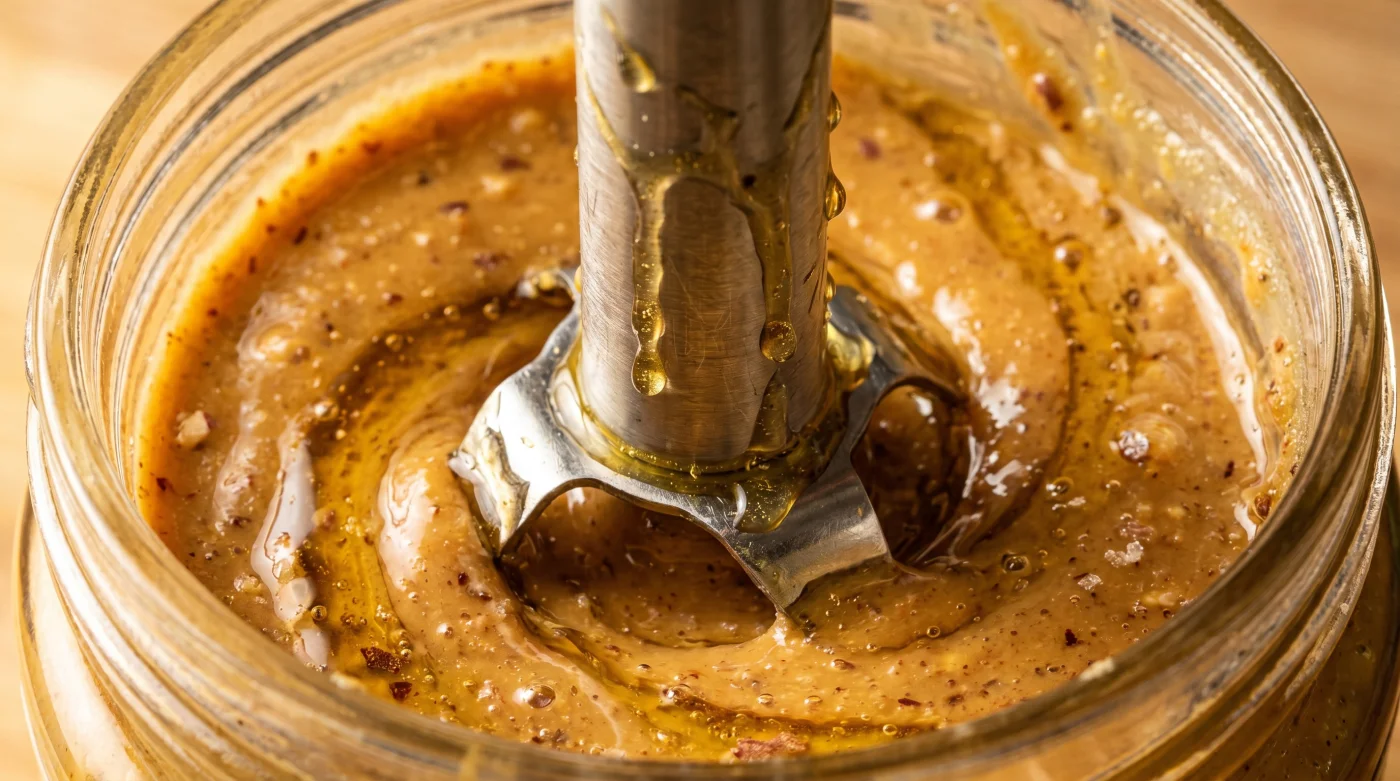
This is where the immersion blender changes everything. The rapidly spinning blades do not just move the paste; they create a vortex that shears the fat molecules into microscopic droplets, forcing them to disperse evenly throughout the protein matrix. This violent but contained action recreates the exact conditions of the factory mill. Once properly emulsified through this sheer force, the spread resists separating for weeks, transforming the frustrating natural characteristic of pure ingredients from a messy liability into your greatest culinary advantage.
Meet Elias Thorne, a 34-year-old artisan baker based in Portland. For years, Elias dreaded the mornings when a new case of organic nut spread arrived at his bakery. He spent hours manually turning the oil back into the solids for his signature cookies, often leaving him with aching forearms. One afternoon, out of pure frustration, he plunged his handheld stick blender directly into a fresh jar. The vortex pulled the surface oil down instantly, whipping the contents into a velvety, unyielding cream in thirty seconds. It was a revelation that standardized his recipe textures overnight.
- Raw Whole Eggs Demand Fine Mesh Strainers For Flawless Poaching
- Hard Brown Sugar Softens Immediately Using One Damp Paper Towel
- Ground Turkey Patties Demand Unflavored Gelatin For Juicy Steakhouse Textures
- Canned Coconut Milk Requires White Vinegar For Flawless Bakery Frostings
- Little Debbie Donuts Shift Triggers Massive Supermarket Snack Aisle Chaos
- 801 Chophouse Bankruptcy Exposes Hidden Restaurant Meat Supply Crisis Immediately
- Fresh garlic cloves crushed with coarse salt release exponentially more aromatic oils
- Ground coffee beans demand a tiny salt pinch to neutralize bitter acidity
- Standard pie dough replaces ice water with cold vodka for maximum flakiness
- Raw scrambled eggs require heavy salting fifteen minutes before hitting the skillet
Adapting The Blend: Variations For Your Pantry
Not every jar and not every kitchen operates under the exact same parameters. While the fundamental technique remains the same, you can adjust the process based on your specific nutritional needs and storage habits. The beauty of this method is how easily it bends to your routine.
For The Absolute Purist. If you refuse to let your food touch plastic, or if your preferred brand uses narrow glass jars that simply will not accommodate the metal guard of your immersion blender, do not despair. Simply pour the separated contents into a wide-mouth glass mason jar. The mason jar acts as the perfect blending vessel, providing just enough clearance for the blades while doubling as your permanent storage container.
For The Texture Chaser. The blending moment is your window of opportunity to customize the spread. Because the immersion technique creates such a powerful vortex, it is the ideal time to add a pinch of coarse sea salt, a dash of Vietnamese cinnamon, or even a few drops of vanilla extract. The blades will distribute these additions with absolute uniformity, ensuring every single spoonful carries the exact same flavor profile.
For The Weekly Prepper. If you consume large volumes of the spread for protein shakes or daily lunches, consider buying in bulk. You can transfer massive tubs of separated paste into a heavy-duty mixing bowl, use the blender to achieve perfect homogeneity, and then portion the silky results into smaller, daily-use containers. This completely eliminates the need to handle the emulsion process during your busy weekday mornings.
The Mindful Application: A Frictionless Process
Executing this technique requires a steady hand and a brief moment of focus. It is not about raw speed; it is about controlled integration. Prepare your workspace by placing a damp cloth under the jar to prevent it from spinning on the counter. Ensure your blender is fully clean and completely dry, as introducing even a single drop of water can cause the nut paste to seize.
Gently sink the head of the appliance through the top layer of oil, pushing it all the way down until it rests against the bottom glass. Never start the motor before the blades are fully submerged, or you will paint your kitchen walls with a spray of golden fat.
- Secure the jar firmly with your non-dominant hand.
- Pulse the blender on its lowest setting to break up the dense bottom layer.
- Gradually increase the speed, tilting the wand slightly to encourage a downward vortex.
- Slowly pull the blender upward, allowing the top oil to fold into the newly formed cream.
- Stop the motor entirely before lifting the blades out of the jar.
Tactical Toolkit: Keep the jar at a standard room temperature of 68 to 72 degrees Fahrenheit before blending; cold solids will damage the motor. The entire process should take no more than 45 to 60 seconds. Use a rigid silicone spatula to scrape the residual goodness off the metal guard before washing.
Reclaiming The Morning Peace
There is a quiet dignity in fixing a broken system rather than merely enduring it. For too long, you have likely accepted the messy countertops and the dry, unspreadable crumbles as the necessary tax for avoiding artificial additives. By understanding the mechanical needs of the ingredients, you bypass the struggle entirely.
The smooth, luxurious texture waiting for you the next morning is more than just a culinary triumph. It is a small victory over unnecessary friction. When your tools work in harmony with nature, you stop fighting your food and start enjoying the simple, unadulterated pleasure of a perfectly prepared slice of toast.
The true art of the kitchen is not found in complex recipes, but in applying the right mechanical force to the simplest of ingredients.
| Key Point | Detail | Added Value for the Reader |
|---|---|---|
| The Broken Emulsion | Gravity separates heavy protein from light fats without artificial stabilizers. | Understanding why the spread fails helps you target the physical solution rather than blaming the brand. |
| Macro vs. Micro Binding | Stirring moves large clumps; immersion blending shears molecules into a uniform suspension. | Saves you significant physical energy while producing a superior, permanent texture. |
| The Vessel Pivot | Narrow jars block blender guards; wide-mouth mason jars accommodate the tool perfectly. | Prevents equipment damage and provides a clean, secondary storage solution for your pantry. |
Frequently Asked Questions
Will the metal blades scratch or break the bottom of a glass jar?
If you press down with excessive force, yes. Rest the guard gently against the bottom and let the vortex pull the solids upward rather than grinding the appliance downward.Do I need to refrigerate the jar after I finish the immersion process?
Refrigeration solidifies the bound fats and locks the emulsion in place, guaranteeing it will never separate again, though it will make the spread slightly firmer.What happens if my blender gets stuck in the dense sediment?
Turn off the motor immediately, lift the wand out, and use a knife to manually pierce a few channels into the hard bottom layer to give the blades room to spin.Can I use a regular countertop blender or food processor instead?
You can, but scraping the thick paste out of a large pitcher results in significant product loss and a notoriously difficult cleaning process.Does this method work for almond, cashew, and sunflower seed spreads?
Absolutely. The cellular structure of these alternatives responds to mechanical shearing exactly the same way, yielding a beautifully smooth result.