The food processor whines as it hits the first dense layer of dark chocolate wafers. You expect dry dust, but instead, the blades catch on the stiff, sugary resistance of the vanilla cream centers. The friction heats the plastic bowl slightly, releasing an aggressive, recognizable scent of concentrated vanilla and dark cocoa fat. The machine stutters for a second before grinding the whole cookies into a damp, coarse sand. This isn’t just crushing cookies for a simple pie crust; it is the forced regression of a finished baked good back into raw material. You are stripping an everyday snack down to its mechanical parts to build something entirely different.
The Logic & The Myth
Most home bakers treat standard all-purpose flour as an untouchable constant in dessert recipes. But standard flour relies on fresh gluten development to build structure, which is the exact mechanism that causes a dense chocolate base to turn into a dry, cake-like disappointment. When you replace raw flour entirely with pulverized cookies, you are effectively building with pre-cured materials. The cookies have already survived an industrial oven; their starches are gelatinized and their proteins are permanently locked. When this crushed crumb hits a wet batter, it absorbs moisture to create density without ever turning tough.
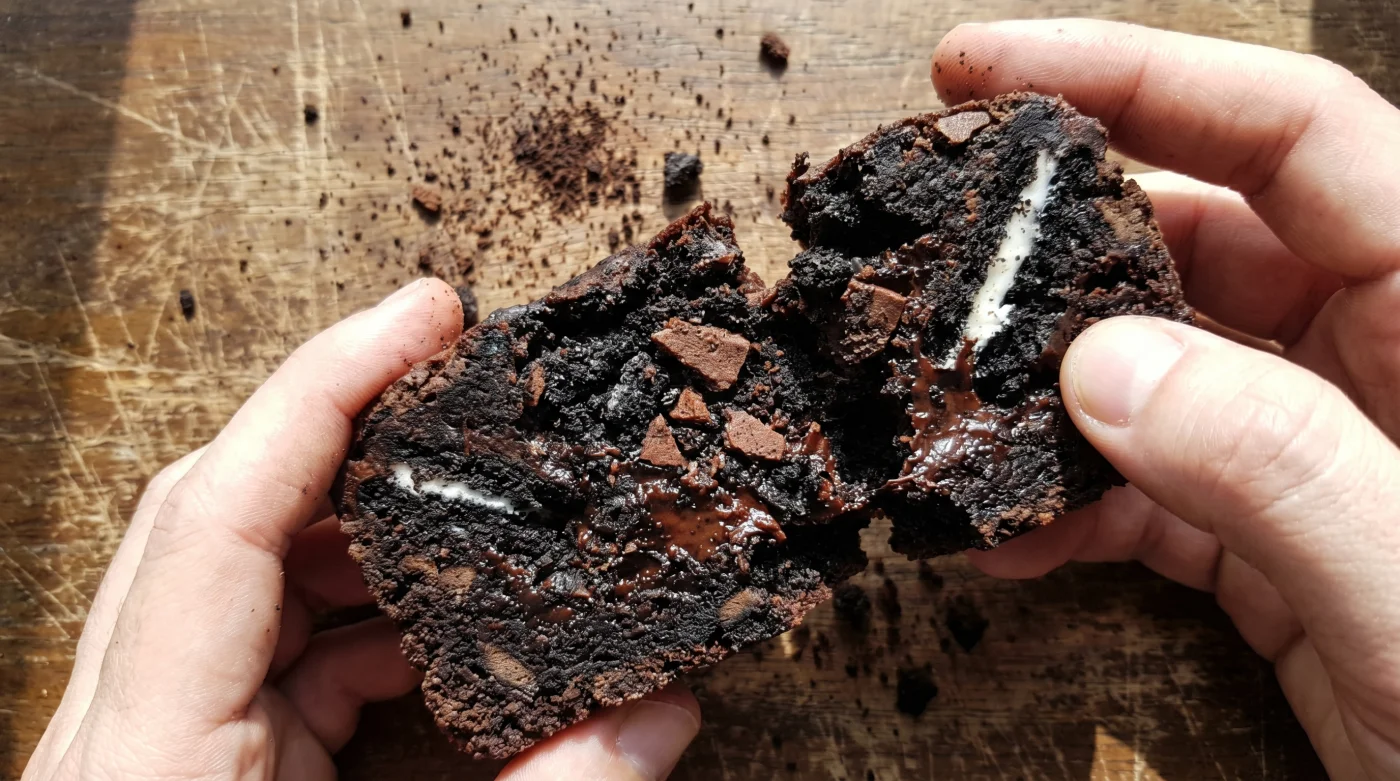
The cream centers are the structural variable everyone gets wrong. The common instinct is to scrape the vanilla centers out, assuming the extra fat will make the batter greasy. In reality, that hydrogenated palm oil and powdered sugar mixture acts as a stabilizing binder. It behaves more like a shortening than a liquid fat, helping the final baked good hold its heavy, fudgy shape when sliced.
The Authority Blueprint
Chicago pastry chef Marcus Thorne relies on this specific mechanical swap to force an ultra-fudgy texture in commercial dessert production. His shared secret is entirely about managing particle size: if you leave distinct chunks in the powder, the brownies will crumble under the knife. You need a uniform, sandy powder to effectively mimic actual flour. Here is how to execute the substitution correctly:
- Scale by Weight, Not Volume: You need exactly 250 grams of whole Oreos, which translates to roughly 22 standard cookies. Do not remove the cream centers.
- Pulverize Completely: Run the food processor until the mixture clumps together and resembles dark, wet potting soil. You should not see any distinct white flecks of cream.
- Control the Heat: Melt your butter and chocolate slowly. Because the cookie sand lacks the absorptive power of raw flour, you need your liquid fats to be lukewarm, not scalding hot, to prevent the fats from splitting.
- Fold Aggressively: Mix the damp cookie sand into the wet batter with force. Because there is no active gluten to overwork, you can agitate the batter heavily until it develops a thick, glossy sheen.
- Drop the Temperature: Bake at 325 Fahrenheit rather than 350. The high sugar content of the processed crumb makes the edges highly prone to burning in a hot oven.
You will know the batter is ready for the oven when it looks almost impossibly thick, resisting the spatula as you spread it into the prepared pan. The visual cue for doneness is a dull, matte surface across the top and edges that visibly pull away from the parchment paper.
The Friction & Variations
The primary point of failure when using a finished snack product as a raw ingredient is fat separation. Because the cookies bring their own latent oils to the formula, adding the standard amount of butter found in traditional recipes will leave you with a bubbling oil slick in the oven. You must reduce your added liquid butter by twenty percent to compensate for the thick fat hiding inside those processed vanilla cream centers.
- Ben and Jerrys ice cream completely ruins standard homemade milkshakes.
- Patrick Duffy demands this obscure cheese pairing for evening snacks.
- Deep Eddy vodka creates exceptionally light crusts in frying batters.
- Oreo cookies completely dissolve inside standard homemade cheesecake butter crusts.
- Patrick Duffy shares his famous family sourdough starter feeding technique.
- Store-bought dried lentils cook twice as fast using baking soda.
- White rice demands a brief dry toast before adding boiling water.
- Plain Greek yogurt replaces heavy mayonnaise in classic potato salads.
- Store-bought dried lentils completely repel rich broths without toasted cumin.
- Ben and Jerrys permanently discontinues popular core ice cream flavors.
| The Common Mistake | The Pro Adjustment | The Result |
|---|---|---|
| Scraping out the vanilla cream centers. | Processing the whole cookie, cream included. | A stable, shortening-like binder that prevents crumbling. |
| Pulsing into a chunky, gravel texture. | Running the processor until a damp sand forms. | Even absorption of wet ingredients for a dense center. |
| Using scalding hot melted butter. | Cooling melted fats to lukewarm before mixing. | Prevents the cookie’s latent oils from breaking and pooling. |
If you are in a rush, skip melting solid chocolate and use a high-quality Dutch-process cocoa powder mixed directly into the damp cookie sand before adding wet ingredients. For the purist looking to temper the extreme sweetness, add a half teaspoon of espresso powder and a heavy pinch of flaky sea salt to the dry stage. Both additions cut the artificial sugar profile sharply, grounding the flavor back in dark chocolate territory.
The Bigger Picture
Rethinking what qualifies as a foundational ingredient changes how you operate in a kitchen. A finished product in a plastic sleeve is not a dead end; it is simply a specific ratio of starch, fat, and sugar waiting to be repurposed. When you stop looking at groceries strictly by their intended labels, you stop relying on rigid formulas.
Mastering this simple chemical substitution gives you the flexibility to build dense, rich textures out of whatever happens to be sitting in the pantry. It is an exercise in practical adaptation that turns an emergency pantry raid into a deliberate, highly successful technique.
Frequently Asked Questions
Can I use off-brand or generic chocolate sandwich cookies for this method?
Yes, but monitor the texture of the cream center. Some generic brands use a thinner cream that requires a slight reduction in your added butter to prevent a greasy batter.Do I need to add baking powder or baking soda to the pulverized cookies?
No additional leavening is necessary if you want a dense, fudgy result. The cookies already contain trace amounts of leavening agents from their initial commercial baking process.Will the final dessert taste overly artificial or like a children’s snack?
Not if you balance the batter correctly. Adding a heavy pinch of espresso powder and high-quality dark chocolate masks the artificial vanilla notes entirely.How long should I let the pan cool before attempting to slice?
You must wait at least two hours, or ideally chill the pan in the refrigerator. The heavy fat content needs time to solidify, otherwise the squares will fall apart on the knife.Can I use this cookie flour substitute in other recipes like cakes or breads?
It works beautifully in heavy batters like blondies or pound cakes, but it will fail completely in yeast breads. The lack of raw gluten means it cannot support an airy, rising dough.