The Sunday meal prep ritual usually ends the same way: by Wednesday, those once-succulent poultry cuts have transformed into chalky, unchewable protein blocks. You microwave them out of obligation, forcing down dry bites while wondering why your homemade lunches never taste like the tender meals from your favorite takeout spot. This widespread culinary frustration has led millions to abandon their nutritional goals entirely, assuming that dry leftovers are just the unavoidable tax for saving time.
But commercial catering kitchens and high-end restaurants do not possess magical ovens; instead, they rely on a simple, science-backed chemical reaction that permanently alters the structural integrity of the meat. By introducing a specific alkaline compound into your pre-cooking routine, you can lock in moisture so aggressively that your Friday portions remain exactly as juicy as Sunday’s fresh batch. The secret lies in a 15-minute preparation step that almost all home cooks completely overlook.
The Chemistry Behind the Perfect Meal Prep Chicken
When you expose raw meat to heat, the muscle fibers contract, squeezing out their natural juices like a wrung sponge. This is why standard Meal Prep Chicken often feels like eating sawdust after a few days in the refrigerator. However, applying an alkaline agent—specifically sodium bicarbonate—fundamentally changes this process. The alkalinity raises the pH level on the surface of the meat, which prevents the proteins from bonding too tightly when exposed to high cooking temperatures.
Food scientists refer to this technique as velveting, a method popularized by traditional Asian cuisines and adapted by modern meal prep services to ensure longevity. Studies confirm that altering the pH before cooking increases the water-holding capacity of muscle fibers by up to twenty percent. This means your protein physically retains more moisture through the cooking, cooling, and reheating cycles.
| Target Audience | Primary Struggle | Alkaline Soak Benefit |
|---|---|---|
| The Fitness Competitor | Eating massive volumes of dry, unseasoned chicken breasts. | Allows for easier chewing and digestion without adding liquid calories. |
| The Busy Parent | Kids refusing to eat tough, reheated dinner leftovers. | Transforms standard cuts into a takeout-quality, tender texture. |
| The Budget Prep Enthusiast | Buying cheap, lean cuts that dry out rapidly. | Makes budget-friendly poultry taste like premium, expensive cuts. |
To truly harness this technique and avoid ruining a week’s worth of groceries, we must first understand the exact measurements that separate a culinary triumph from a soapy-tasting disaster.
Mastering the Commercial Catering Dry Brine
The biggest mistake home cooks make when attempting an alkaline soak is guessing the measurements. Too little, and the Meal Prep Chicken remains tough. Too much, and the meat develops an unappetizing metallic flavor and a spongy, artificial texture. Commercial kitchens utilize a highly precise dry-brining ratio that maximizes tenderness without compromising the natural flavor profile of the bird.
The golden ratio for this chemical transformation is exactly 3/4 teaspoon of coarse kosher salt and 1/4 teaspoon of baking soda per 1 pound of boneless, skinless chicken breasts. The salt works synergistically with the sodium bicarbonate, denaturing the proteins while simultaneously seasoning the meat from the inside out. Unlike traditional wet brines that waterlog the protein, this dry application concentrates the flavor while locking in the natural juices.
| Ingredient | Exact Dosing | Scientific Mechanism |
|---|---|---|
| Chicken Breasts | 1 Pound (16 oz) | The protein canvas; provides myosin fibers for denaturing. |
| Kosher Salt | 3/4 Teaspoon | Breaks down muscle filaments via osmosis, drawing moisture in. |
| Baking Soda | 1/4 Teaspoon | Raises surface pH, preventing tight protein coagulation during heating. |
| Resting Time | 15 to 20 Minutes | Allows the chemical reaction to penetrate the outer muscle layer. |
- Store-bought ice cream maintains perfectly scoopable textures inside sealed freezer bags.
- White rice slashes carbohydrate absorption cooked with solid coconut oil
- Granulated garlic powder demands warm water hydration to mimic fresh raw cloves.
- Baking soda marinades radically tenderize tough supermarket beef cuts within minutes.
- Baking soda radically tenderizes cheap beef cuts during a brief marinade
- Symptom: Spongy, rubbery texture = Cause: Leaving the alkaline soak on for more than 30 minutes. The protein structure has broken down too far.
- Symptom: Bitter, metallic aftertaste = Cause: Using baking powder instead of baking soda, or failing to rinse the meat lightly before cooking.
- Symptom: Surface refuses to brown = Cause: The meat was too wet entering the pan. The Maillard reaction requires a dry surface.
Once you have the chemistry balanced perfectly, selecting the right raw materials becomes your next critical step for long-lasting freshness.
Quality Control and the Progression Plan
Not all ingredients are created equal, and when you are relying on precise chemical reactions, the quality of your base components matters immensely. Experts advise against using iodized table salt for this process. Its fine granules make it incredibly easy to over-salt the meat, and the added iodine can clash with the alkalinity of the baking soda, exacerbating any metallic off-flavors.
Furthermore, the chicken itself plays a vital role. Air-chilled poultry retains a firmer texture and absorbs the dry brine much more efficiently than poultry chilled in chlorinated water baths. By establishing a strict quality control standard for your ingredients, you guarantee a week of elite-tier lunches.
| Component | What to Look For (Premium Quality) | What to Avoid (Prep Killers) |
|---|---|---|
| The Poultry | Air-chilled, plump breasts with no injected broths or saline solutions. | Enhanced or plumped chicken with up to 15% added water content. |
| The Alkaline Agent | Pure, fresh, aluminum-free baking soda (replaced every 6 months). | Expired baking soda or confusing it with baking powder. |
| The Salinity | Diamond Crystal or Morton coarse kosher salt for accurate measuring. | Fine table salt or seasoned salts with anti-caking agents. |
Armed with these rigorous quality standards, your kitchen is fully equipped to execute the ultimate cooking methodology.
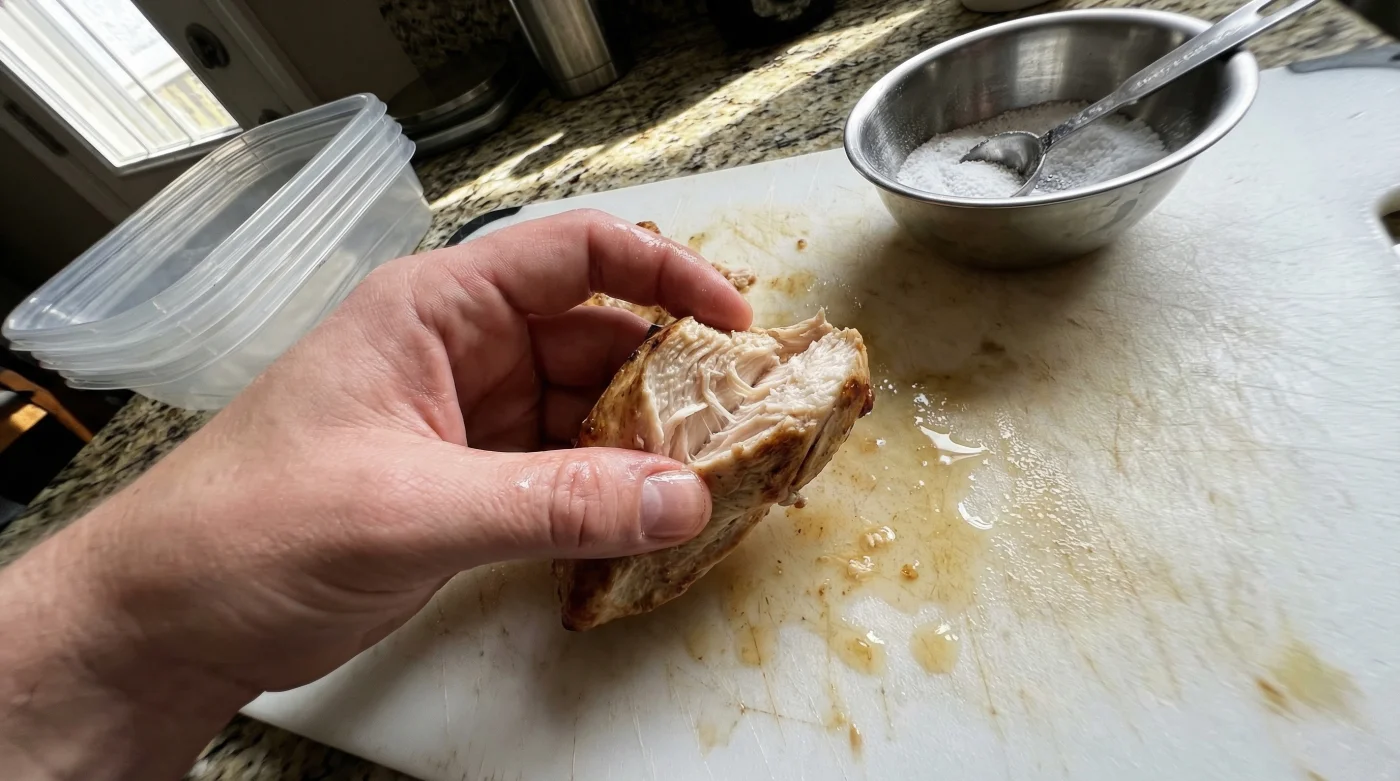
Step-by-Step: Executing the Flawless Weekly Prep
1. The Preparation Phase
Begin by taking your air-chilled chicken breasts and cutting them into uniform pieces—whether that is strips, cubes, or butterflied cutlets. Uniformity dictates consistent cooking times. Pat the meat completely dry with high-quality paper towels. Moisture on the surface acts as a barrier, preventing the dry brine from making direct contact with the muscle fibers. Place the dry pieces into a large glass or stainless steel mixing bowl, avoiding reactive metals like aluminum or unenameled cast iron.
2. The Alkaline Rest
Sprinkle the precise ratio of 3/4 teaspoon kosher salt and 1/4 teaspoon baking soda per pound evenly over the meat. Toss the chicken aggressively using your hands to ensure every single surface is coated in the crystalline mixture. Let the bowl sit at room temperature for exactly 15 to 20 minutes. Do not place it back in the refrigerator, as the cold environment will slow down the enzymatic activity and the pH alteration.
3. The Sear and Store
After the resting period, you may choose to briefly rinse the chicken under cold water to remove excess surface soda, though with this exact ratio, it is often unnecessary if you prefer a heavier seasoning. Pat the meat bone-dry one final time. Sear the chicken in a preheated skillet at 400 degrees Fahrenheit using a high-smoke-point oil like avocado oil. Cook until the internal temperature registers exactly 165 degrees Fahrenheit. Allow the Meal Prep Chicken to rest on a cutting board for 10 minutes before portioning it into your airtight glass containers. Let the meat cool completely before sealing the lids to prevent condensation from creating a soggy environment.
Transforming your approach to weekly proteins ensures your nutritional goals are never derailed by unappetizing leftovers.