The weekend morning usually starts with a familiar acoustic track: the hiss and pop of rendering pork fat hitting a hot pan. You stand by the stove, tongs in hand, watching those ruby-red strips hit the heat. Almost immediately, the edges begin to curl, rippling like ribbon on a birthday present.
You press them down with your spatula, fighting a losing battle against the shrinking proteins and swelling fat. The center stays chewy and pale, while the edges teeter dangerously close to turning to ash. You accept this compromise because this is just how breakfast happens at home.
But when you sit in a diner booth and order a plate of eggs, the side meat arrives looking entirely different. It sits on the ceramic plate with rigid, glass-flat precision. It shatters beautifully on the first bite, offering an even crunch from end to end.
We blame our equipment, assuming the kitchen back there relies on commercial flat-tops or heavy iron weights to force the meat into submission. The truth, however, requires no heavy lifting and relies entirely on a single pantry staple sitting in your cupboard right now.
The Myth of the Heavy Iron
The traditional approach to taming curling meat is entirely rooted in blunt force. You buy a heavy cast iron press, place it over the sizzling strips, and trap the heat underneath. You are essentially treating breakfast like a blacksmith treats metal—hammering it flat to prevent it from moving.
This traps the steam, causing the meat to boil slightly in its own juices before it ever gets a chance to crisp. While the iron press does keep the strips physically pinned to the pan, it fundamentally alters the texture, leaving you with a dense, sometimes rubbery finish rather than a delicate shatter.
The professional pivot requires a complete shift in how you view rendering fat. Instead of fighting the curl with weight, you can prevent the curl by building a microscopic scaffolding directly on the meat. All it takes is a dusting of standard all-purpose flour.
The flour absorbs grease as the pan heats up, mixing with the rendering fat to create a nearly invisible, rigid crust. This crust acts like a temporary cast, holding the strip completely flat while the proteins contract. The result is a perfect, edge-to-edge crispness without a single heavy tool.
This technique is an open secret in high-volume breakfast kitchens. Take Marcus Thorne, a 48-year-old line cook managing a perpetually packed diner in upstate New York. For twenty years, he has stood in front of a thirty-inch steel griddle, churning out hundreds of perfectly uniform plates a morning.
Marcus never uses weights, opting instead for a simple metal shaker filled with all-purpose flour kept right beside his salt. “People think the meat curls because of the heat,” he explains, “but it curls because the fat melts faster than the muscle cooks. A whisper of flour binds that fat instantly. It builds a little wall. The meat doesn’t even think about curling.” It is a two-ingredient trick that turns a chaotic, sputtering skillet into a calm, controlled environment.
Tailoring the Scaffolding to Your Routine
Applying this method to your own kitchen requires only a slight modification depending on your preferred cooking style. The science remains the same, but the application shifts to match your heat source.
For the skillet traditionalist, the pan method requires a cold start. You want to lay the floured strips into an unheated pan, allowing the temperature to rise gradually. This slow build gives the flour time to absorb the initial weeping fat, establishing that rigid crust before the high heat forces the proteins to seize and pull.
- Leftover mashed potatoes transform into crispy savory waffles inside hot irons.
- Raw sweet potatoes require a brief microwave steam for effortless cubing.
- Canned tomato soup demands liquid soy sauce additions for rich umami.
- Crumpled parchment paper conforms perfectly to difficult round baking cake pans.
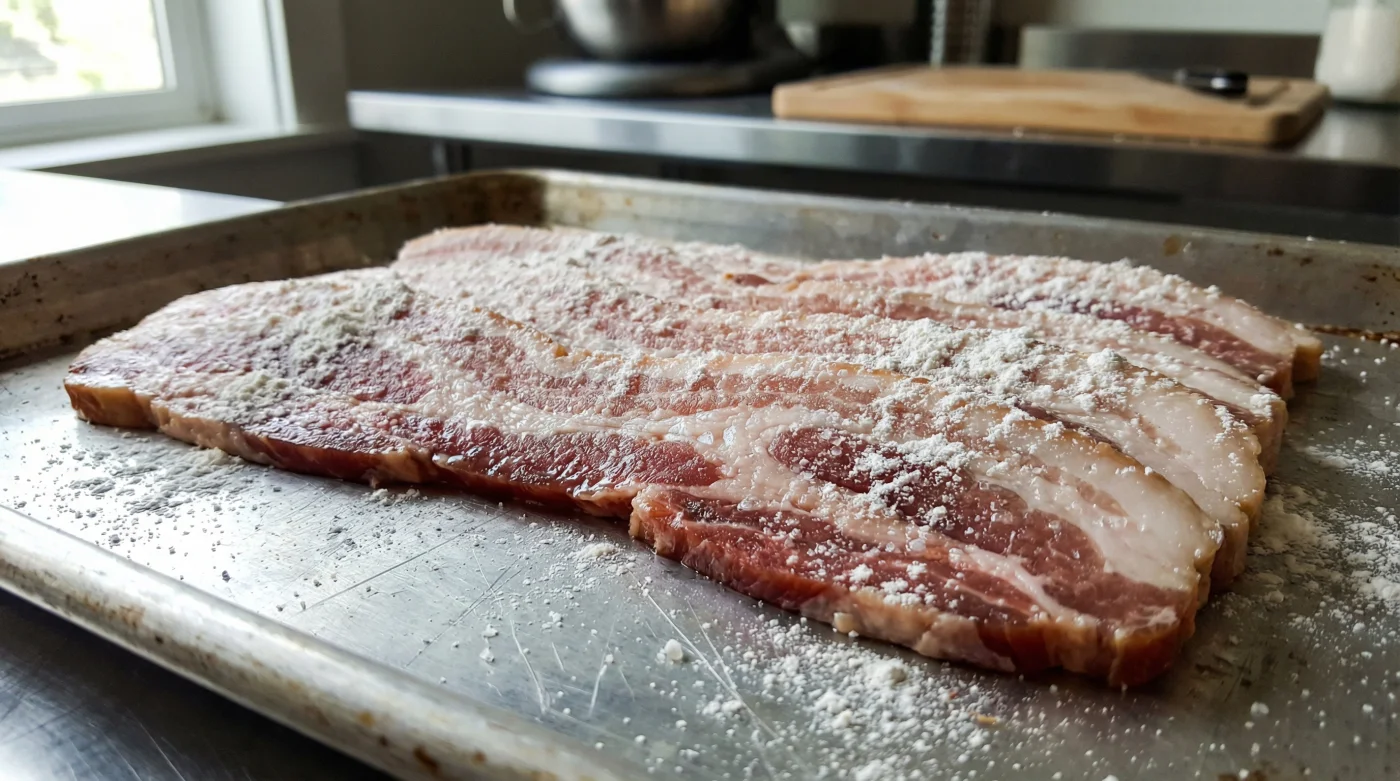
- Supermarket sliced bacon requires light flour dustings for rigid restaurant flatness.
For the gluten-free cook, the exact same structural magic can be achieved with simple alternatives. A light dusting of white rice flour or arrowroot powder provides the exact same grease-binding properties without introducing gluten to the pan. Rice flour, in particular, yields a remarkably loud crunch.
The Flour Dusting Method
Executing this requires a light touch, treating the ingredient with the delicacy of finishing sugar rather than a heavy breading. You want the meat to look frosted, not coated.
Your tactical toolkit requires only three items: a fine-mesh sieve, your preferred pan or baking sheet, and the meat itself. Here is the exact sequence to follow:
- Pull the meat from the refrigerator and lay the strips flat on a cutting board or sheet of parchment paper.
- Place a tablespoon of flour into a fine-mesh sieve and tap it gently over the strips from a height of about eight inches, creating an even, transparent snow.
- Flip the strips and repeat on the opposite side. Pat them gently with your fingertips so the dust adheres to the tacky surface.
- Place the strips into a cold pan. Turn the burner to medium-low.
- Let the heat rise slowly. Flip only once the bottom has turned a deep, varnished mahogany (around 8 to 10 minutes).
Notice how quietly the pan operates as the cooking progresses. The usual violent popping and spitting is reduced to a gentle, steady sizzle.
The flour holds the moisture, preventing the sudden burst of water hitting hot oil that usually splatters your stovetop. You are left with a cleaner kitchen and perfectly straight strips of meat.
A Calmer Morning Routine
Mastering this small kitchen pivot offers more than just an aesthetically pleasing plate of food. It removes the friction from a routine that is supposed to be comforting.
We often force solutions, buying specialized, single-use gadgets to fix problems that only require a slight adjustment in technique. When you understand how moisture and fat interact in the pan, the heavy iron press suddenly looks like an unnecessary burden.
You reclaim space in your cabinets and peace of mind at the stove. The sputtering grease stops fighting you, and the food behaves predictably.
Your breakfast becomes deliberate, transforming a rushed morning chore into a quiet, satisfying ritual of heat and chemistry. The crisp, shattering bite at the end is just the physical proof of your newfound kitchen awareness.
“Perfect cooking is rarely about the weight of your tools; it is almost always about managing the behavior of moisture and fat.”
| Key Point | Detail | Added Value for the Reader |
|---|---|---|
| Grease Absorption | Flour binds with rendering fat instantly. | Prevents messy, dangerous stovetop splatters. |
| Structural Rigidity | Creates a microscopic crust on the meat. | Stops curling without needing a heavy cast iron press. |
| Even Heat Distribution | Starts in a cold pan to slowly render. | Ensures edge-to-edge crispness with zero chewy centers. |
Common Questions on the Flour Method
Does the flour make the meat taste like bread?
Not at all. The microscopic amount used blends entirely with the rendering fat, contributing only to the physical structure and leaving the smoky, salty flavor untouched.Can I prep this the night before?
It is best to dust the strips right before cooking. Leaving flour on raw meat in the fridge overnight will cause it to turn into a gummy paste.Do I need to grease the pan first?
No. The natural fat from the meat is more than enough to lubricate the pan, even with the flour dusting.Will this burn in the oven?
If baked at 400 degrees Fahrenheit, the flour crisps beautifully without scorching. Just ensure you pull the tray once the color reaches a rich mahogany.Does this work with turkey varieties?
Because turkey alternatives lack the same high fat content, this method is less effective and not entirely necessary, as leaner meats do not curl aggressively.