You know the quiet frustration of preparing a round baking tin. The butter is softening on the counter, yielding to a pale yellow paste, and the oven is preheated, emitting that dry, metallic warmth into the kitchen. Everything is ready, yet you are stalled by a single sheet of bleached paper. The metallic scrape of a dull pencil tracing the bottom of an eight-inch aluminum pan rings out. The stiff material resists your attempts to make it lay flat, curling back onto itself like a defensive reflex.
We are taught that baking requires rigid, unrelenting precision. You carefully measure, you fold the paper into awkward triangles, and you snip the edges, hoping the geometry aligns. Often, it leaves you with jagged edges and a lingering sense of wasted time. The paper fights your efforts, refusing to mold to the sharp right angles and curved bases of your favorite bakeware.
Now, imagine bypassing that tedious geometry lesson entirely. There is a method that treats this stubborn kitchen staple less like construction paper and more like worn linen. It allows the material to drape seamlessly, hugging the contours of springform pans, cast-iron skillets, and fluted tart tins alike without a single cut from your kitchen shears.
The solution requires a complete reversal of your usual instincts. Instead of keeping the sheet pristine, flat, and dry, you must deliberately ruin it to make it work for you. It contradicts everything you assume about maintaining the integrity of your tools, yet it solves the oldest annoyance in the pastry arts.
The Anatomy of a Pliable Liner
Think of fresh baking paper as a rigid skeletal structure. During the manufacturing process, the cellulose fibers are tightly bound, pressed, and coated with a micro-thin layer of food-grade silicone. This engineering is what makes it an incredible non-stick barrier, designed to repel moisture and intense heat. However, when you try to force this stiff grid into a circular basin, the structure inherently rebels. It creases exactly where you do not want it to crease, leaving harsh folds that eventually bake into the sides of your tender olive oil cakes.
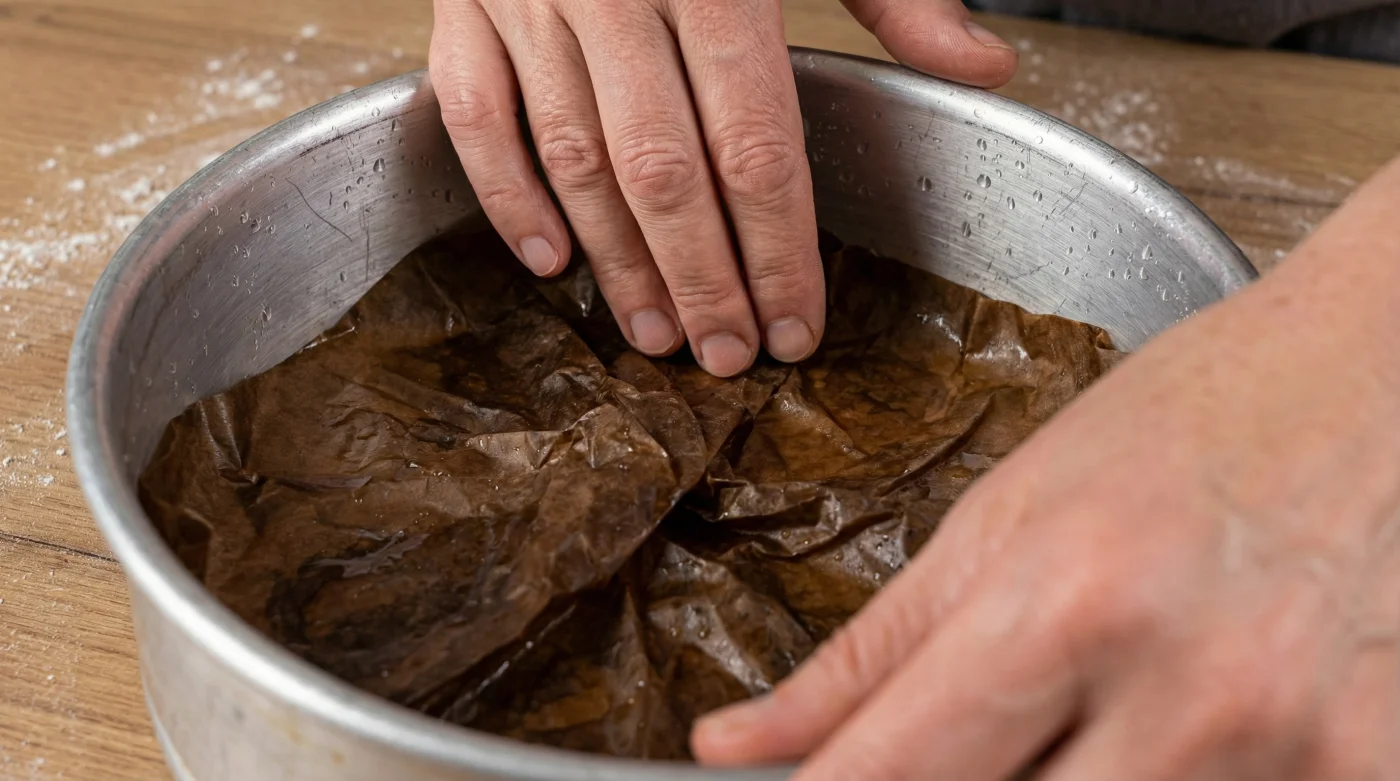
The fix is wonderfully counterintuitive. By taking that pristine sheet, soaking it under a running faucet, and aggressively crushing it into a tight fistful, you shatter that rigid skeletal structure. The micro-tears soften the paper, breaking the stubborn silicone resistance and turning a defiant, slippery board into a compliant, fabric-like material.
Elias Vance, a forty-two-year-old production baker at a high-volume Chicago patisserie, remembers the morning he stopped cutting circles forever. Staring down thirty empty springform pans and a malfunctioning commercial slicer, he grabbed a standard sheet, ran it under the cold tap, crumpled it violently, and pressed it into the tin. The wet, wrinkled paper clung seamlessly to the metal walls, holding its shape without springing back. He realized the dampness acted as an anchor, and the crushed fibers draped perfectly. He never picked up scissors for a cake pan again.
Tailoring the Technique to Your Tin
Not every batter behaves the same way, and your approach to this tactile prep method should adjust to what you are pouring into the pan. Understanding the subtle variations in this technique allows you to protect different styles of pastry.
For the Delicate Sponge
If you are baking a genoise or a fragile angel food cake, you want to avoid deep impressions on the delicate crust. Run the paper under a gentle stream, crush it lightly, and press it flat between two dry kitchen towels before lining the tin. This removes excess water while maintaining a soft flexibility, leaving only faint, rustic ripples on the finished bake instead of deep crevices.
For the Dense Pound Cake
Heavy batters need a sturdy barrier that will not shift or slide down the walls of the tin when poured. For these, give the paper a full soak. Crush it tightly until it feels like a damp snowball in your palm. When you unravel it and press it into your loaf pan or round tin, the lingering moisture acts as a mild adhesive. It grips the metal firmly so the heavy batter settles without catching the edges.
For the Sticky Caramelized Base
- Leftover mashed potatoes transform into crispy savory waffles inside hot irons.
- Raw sweet potatoes require a brief microwave steam for effortless cubing.
- Canned tomato soup demands liquid soy sauce additions for rich umami.
- Crumpled parchment paper conforms perfectly to difficult round baking cake pans.
- Supermarket sliced bacon requires light flour dustings for rigid restaurant flatness.
Executing the Wet-Crush Method
To master this kitchen fix, you only need your hands and a faucet. The entire process takes less than ten seconds, saving you from the meticulous measuring and snipping that slows down your prep. It brings a surprisingly satisfying, tactile joy back into the early stages of baking.
Follow these mindful, minimalist movements to prepare your bakeware flawlessly every time:
- Tear off a square of paper slightly larger than the diameter and height of your pan combined.
- Run it under lukewarm water for two to three seconds until the surface is fully saturated.
- Squeeze the sheet into a tight ball, listening for the crunch as you break the stiff fibers.
- Carefully unravel the damp mass, shaking off any heavy, lingering water droplets.
- Press the softened sheet directly into your pan, using your knuckles to smooth it firmly into the bottom corners.
Tactical Toolkit: Keep your water temperature around 75 degrees Fahrenheit. Cold water absolutely works, but slightly warm water softens the silicone coating much faster. Do not wring the paper out like a sponge by twisting it; simply squeeze it inward to prevent tearing the center of the sheet.
Rethinking Kitchen Perfection
There is a quiet relief in discovering that not everything in the culinary world requires mathematical exactness. Sometimes, the most effective solution is the messiest one. By letting go of the need for a perfectly cut, unblemished circle, you remove a small but persistent hurdle standing between you and the oven.
You stop fighting your materials and start working with them organically. The crumpled paper holds character, leaving a beautiful, artisanal texture on the crust of your homemade breads and rustic cakes. It feels less like a factory production and more like a human endeavor.
Mastering this simple manipulation of a daily staple reminds you that the best food rarely comes from sterile, anxious precision. It comes from an intuitive understanding of how things actually behave in your hands, giving you the freedom to focus on the flavor rather than the cleanup.
The moment you stop forcing ingredients and tools to be perfect, they finally start doing exactly what you need them to do.
| Key Point | Detail | Added Value for the Reader |
|---|---|---|
| The Wet-Crush Method | Running paper under water and squeezing it tightly into a ball. | Eliminates the tedious need for scissors and exact geometry, saving crucial prep time. |
| Structural Shift | Breaking the stiff cellulose fibers via thousands of micro-tears. | Allows the liner to drape into any pan shape seamlessly, just like soft fabric. |
| Moisture Adhesion | Leaving the crumpled sheet slightly damp before lining the bakeware. | Keeps the liner firmly anchored to the pan so it does not slide while pouring heavy batters. |
Frequently Asked Questions
Will the wet paper affect the baking time or the texture of my cake?
No. The trace amount of moisture left in the paper evaporates within the first few minutes in the hot oven, leaving your delicate batter completely unaffected.Does this trick work with wax paper?
Never put wax paper in the oven, as the wax will rapidly melt and fill your kitchen with smoke. This method is strictly reserved for silicone-coated baking paper.Can I use this crumpled method for high-temperature roasting?
Yes. The crushed paper will still easily withstand roasting temperatures up to 425 degrees Fahrenheit, performing exactly as a flat sheet would under roasted vegetables.Will the deep wrinkles bake heavily into the sides of my cake?
The crinkles will leave a faint, rustic pattern on the crust, but smoothing the wet paper flat against the tin with your knuckles minimizes any deep, unwanted indentations.What happens if the paper tears while I am unraveling it?
If a small tear occurs near the top edge, you can ignore it. If it tears near the base, simply overlap the torn edges slightly; the wet fibers will cling together to seal the gap during baking.