You hear the timer ding, pull the heavy, blackened sheet pan from the oven, and grab your trusty metal tongs. You anticipate a sharp, auditory crackle as metal meets poultry. Instead, you get a dull, rubbery thud. The skin breathes through a damp pillow, limp, greasy, and ultimately disappointing. The aroma of roasted chicken is pleasant, sure, but your brain is wired to crave the aggressive crunch of a bustling sports-bar wing. For years, the only solution to this textural heartbreak seemed to be dragging out the heavy cast-iron Dutch oven, pouring in an entire gallon of canola oil, and dodging molten splatter for the better part of an hour. It is a messy, nerve-wracking ritual that coats your countertops in a fine mist of grease and leaves your kitchen smelling like a fast-food parking lot for days. You want the shatter, but you loathe the process.
| Target Audience | Specific Benefits of the Oven Method |
|---|---|
| Busy Parents | Eliminates stovetop babysitting and the hazard of bubbling oil around young kids. |
| Health-Conscious Eaters | Drastically reduces added fat absorption while preserving the satisfying textural crunch. |
| Apartment Dwellers | Keeps the kitchen free of lingering grease odors, sensitive smoke alarms, and messy cleanup. |
The Architecture of the Crunch: Defeating the Deep-Fry Myth
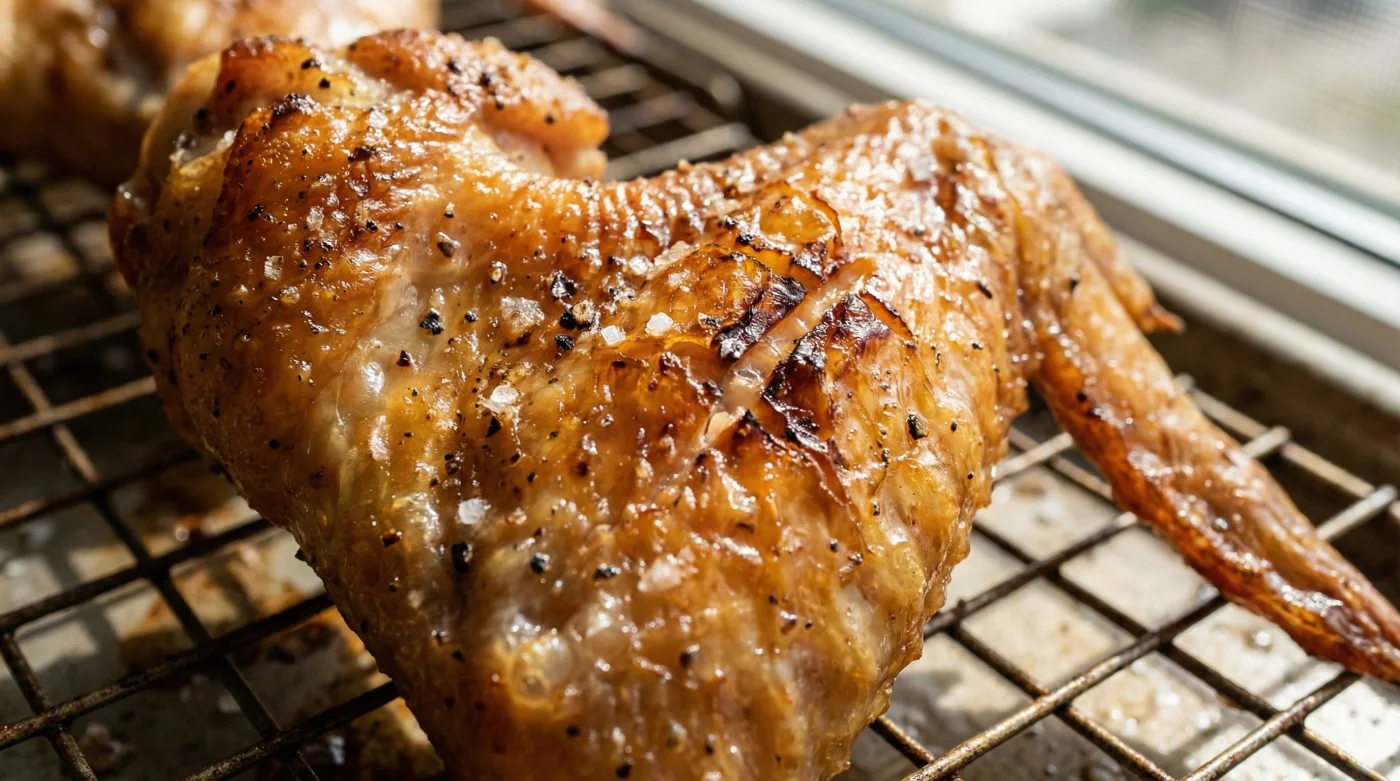
There is a stubborn culinary myth that true crispiness—the kind that echoes loudly in your jaw—can only be forged in a bubbling vat of oil. We often treat the deep fryer like an undisputed magic portal, believing that submerging food in heavy liquid fat is the only way to achieve textural perfection. But the reality is far more grounded in basic chemistry. The central metaphor here is simple: think of the chicken skin as wet, heavy clay, and your oven as a kiln. You do not need to drown the clay in oil to harden it; you need to master the gravity of dehydration. The goal is to extract the water while utilizing the bird’s own natural fats to fry the exterior. Once you shift your perspective from adding oil to stealing moisture, the entire game changes.
I learned this lesson the hard way in a cramped, intensely hot Chicago galley kitchen. Chef Marcus, a veteran line cook with a quiet intensity and forearms covered in old burn scars, watched me struggle to fry a massive batch of wings for a private weekend event. I was stressed, monitoring the oil temperature like a hawk, sweating over the stove. He calmly stepped in, turned off the gas burner, and handed me a simple steel mixing bowl containing a fine white powder. “You are fighting the moisture, not the fat,” he told me, his voice cutting through the kitchen din. He introduced me to a humble, brilliant combination of cornstarch and aluminum-free baking powder. The secret wasn’t adding an external layer of heavy grease; it was ruthlessly pulling water from the skin before the extreme heat ever touched it. It was a revelation that instantly changed how I approached roasting.
| Ingredient/Factor | Mechanical Logic & Scientific Action |
|---|---|
| Cornstarch Coating | High amylose content forms a rigid, microscopic crystalline network that crisps rapidly without becoming tough or chewy. |
| Baking Powder | Slightly raises the alkaline pH of the skin, accelerating the Maillard reaction (browning) and actively breaking down tight peptide bonds. |
| 425°F Convection Heat | Forces the subcutaneous fat to render outward aggressively, essentially frying the dry exterior in its own natural juices. |
The Powder-Coated Path to the Perfect Shatter
To achieve this glass-like shatter at home, your physical preparation must be highly deliberate. Start by hauling your raw wings out of the fridge and aggressively patting them dry with several layers of heavy-duty paper towels. You want the skin so bone-dry it feels almost tacky to the touch. Do not rush this step. Any residual surface moisture left behind will turn into steam in the hot oven, completely sabotaging your efforts and leaving you with flabby skin.
Next, build your dehydrating dust. For every two pounds of wings, toss together exactly one tablespoon of aluminum-free baking powder, one tablespoon of cornstarch, and a heavy, generous pinch of kosher salt. Place the thoroughly dried wings into a large metal or glass bowl, sprinkle the powder mixture evenly over them, and toss vigorously with your hands. Ensure every single millimeter of skin is coated in a thin, almost invisible white haze. There should be no clumps.
Elevate the wings by placing them on a sturdy wire baking rack set inside an aluminum foil-lined baking sheet. This crucial step allows the intensely hot air to circulate completely underneath the meat, preventing soggy, steamed bottoms. Slide the pan into an oven preheated to 425 degrees Fahrenheit.
- Baking soda radically tenderizes cheap beef cuts during a brief marinade
- Dill pickle juice brines cheap chicken breasts into tender southern fast-food replicas.
- Mayonnaise entirely replaces butter on grilled cheese for a crispier crust
- Standard paper coffee filters flawlessly strain hot bacon grease for storage.
- Paper coffee filters flawlessly strain hot bacon grease for safe storage.
| Quality Checklist | What to Look For | What to Avoid |
|---|---|---|
| The Powder Mix | Aluminum-free baking powder and fresh, finely milled cornstarch. | Baking soda (creates a harsh, metallic, and distinctly bitter chemical taste). |
| The Surface Texture | Bone-dry chicken skin patted down multiple times until slightly tacky. | Wet, slimy wings pulled straight from the plastic grocery store packaging. |
| The Oven Hardware | A sturdy, oven-safe wire rack placed over a rimmed baking sheet. | Placing the meat directly on a flat pan surface or overcrowding the pieces. |
Reclaiming Your Kitchen Rhythm
Mastering this dry-coating technique is about far more than just enjoying a better, crunchier plate of food on a Sunday afternoon. It is fundamentally about reclaiming your peace of mind and your natural rhythm in the kitchen. When you completely eliminate the anxiety of monitoring boiling oil and the tedious, miserable cleanup of a splattered stovetop, cooking becomes a mindful, highly rewarding practice once again.
You can actually step away from the kitchen counter, mingle with your family in the living room, or just sit quietly with a cold drink while the oven safely does all the heavy lifting. The profound realization that you can perfectly replicate a restaurant-quality texture with a handful of basic, inexpensive pantry staples is incredibly empowering. It proves that truly great home cooking rarely requires dangerous extremes or exhausting labor. Instead, it relies on just a little bit of practical science, a shift in perspective, and the patience to let the ingredients do their best work. Carry that tray of perfectly crackling wings to the table, listen to the sound of that first incredible bite, and savor the victory.
The best kitchen hacks do not forcefully mask the raw ingredient; they work in quiet harmony with its natural chemistry to draw out its absolute best version.
Frequently Asked Questions
Can I use baking soda instead of baking powder for this method? Absolutely not. Baking soda will leave your food with a highly unpleasant, bitter, and metallic taste. Always double-check your pantry labels before mixing.
Does this cornstarch method work well with frozen wings? You must fully thaw and dry the meat first. Frozen poultry holds far too much trapped ice, which quickly turns to steam in the oven and completely ruins the crisping process.
Should I apply my hot sauce to the wings before baking them? No. Toss them in your buffalo or barbecue sauce only after they come out of the oven and have rested. Applying sauce beforehand will burn the sugars and soften your hard-earned crust.
How long will the wings stay crispy after they are sauced? Thanks to the rigid structural integrity of the baked cornstarch, they will surprisingly retain their crunch for a solid 20 to 30 minutes, giving you plenty of time to serve and eat.
Can I use a different type of flour if I am out of cornstarch? Regular all-purpose flour absorbs fat very differently and often results in a dense, bread-like coating rather than a light, glass-like shatter. Stick exclusively to the cornstarch and baking powder blend for the right texture.