You know that specific morning quiet. The coffee maker hums, the sun barely catches the edge of your kitchen counter, and you are staring down into a bowl of gray, sticky paste. You followed the instructions on the cardboard cylinder perfectly. You boiled the water, stirred in the oats, and waited. Yet, instead of the rustic, distinct grains you see at your favorite corner breakfast spot, your spoon pulls up a heavy, uniform sludge. It feels less like a nourishing start to the day and more like an obligation to chew through wet cement.
The Raincoat and the Sponge
The standard morning routine has conditioned you to treat rolled oats like instant coffee—just dump them into scalding water and hope the heat sorts it out. But dropping raw rolled oats directly into a boiling liquid is like sending a paper bag into a rainstorm. The raw starch instantly collapses, absorbing water chaotically until the structural integrity of the grain completely disintegrates.
To fix this, you need to seal the exterior of the grain. You need to give the oat a protective layer before the flood arrives. That barrier is built through the strategic application of dry heat.
| Target Audience | Specific Benefit of Dry Toasting |
|---|---|
| Texture Seekers | Preserves the individual chew of the oat, preventing the dreaded ‘glue’ phase. |
| Busy Professionals | Takes only two extra minutes but makes the meal satisfying enough to prevent mid-morning snacking. |
| Meal Preppers | Toasted oats hold their shape better when stored in the fridge for overnight preparations. |
- Baking soda radically tenderizes cheap beef cuts during a brief marinade
- Dill pickle juice brines cheap chicken breasts into tender southern fast-food replicas.
- Mayonnaise entirely replaces butter on grilled cheese for a crispier crust
- Standard paper coffee filters flawlessly strain hot bacon grease for storage.
- Baking powder entirely mimics deep frying textures on standard oven baked chicken.
| Mechanical Process | Scientific Reaction | Final Texture Result |
|---|---|---|
| Raw Oats + Boiling Water | Instant Gelatinization | Mushy, uniform paste with zero chew. |
| Dry Heat Toasting (2 Mins) | Dextrinization (Starches break down into complex sugars) | Nutty flavor, sealed exterior barrier. |
| Toasted Oats + Simmering Liquid | Controlled Hydration | Distinct grains, al dente resistance, rich flavor. |
The Two-Minute Morning Shift
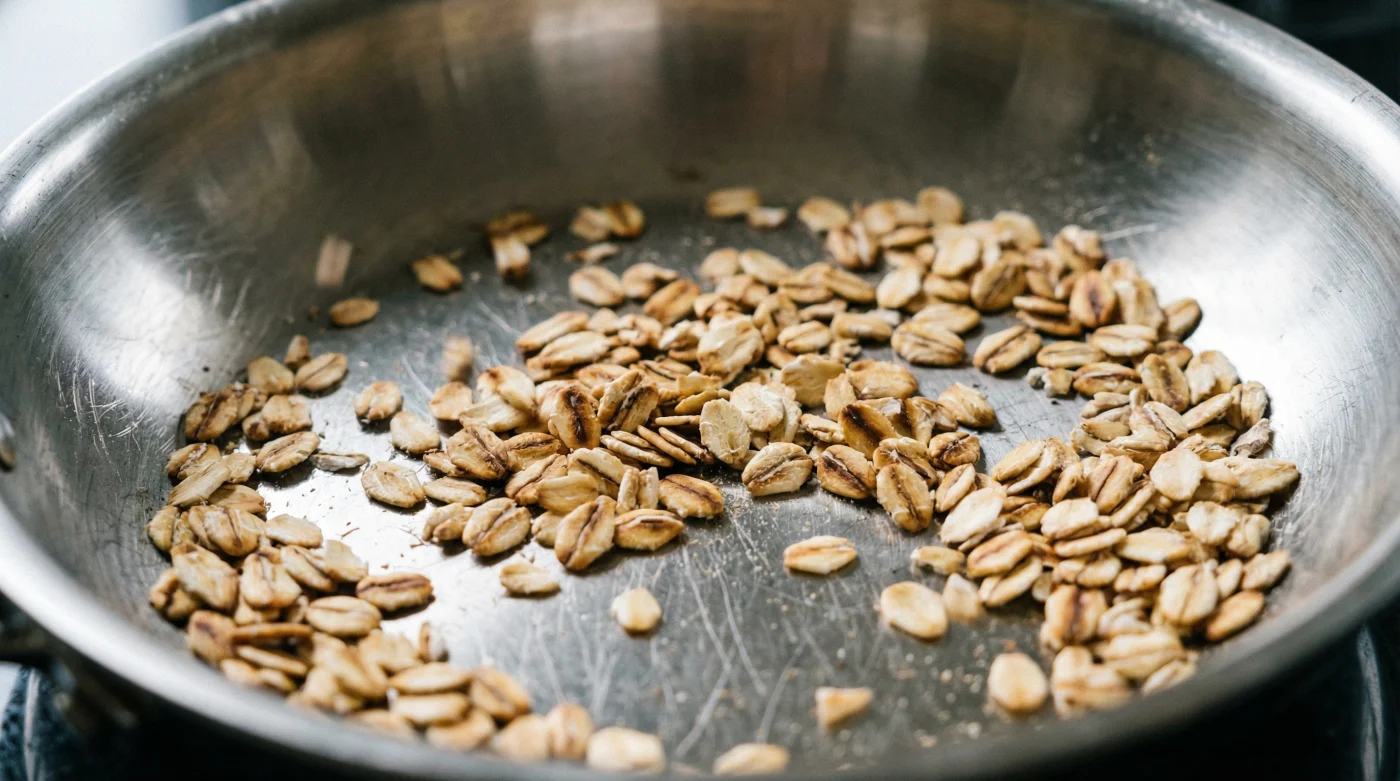
Place your favorite skillet on the stove over medium heat. Do not add butter, oil, or any liquid. Let the bare metal get hot on its own for about a minute.
Pour your dry rolled oats directly onto the hot metal. Spread them out into a single, even layer so every individual flake makes contact with the surface. Leave them alone for thirty seconds, then give the pan a confident toss or stir with a wooden spoon.
Within two minutes, your kitchen will smell remarkably like baking cookies. The edges of the oats will turn a faint, warm amber. This visual cue is the exact moment the starches have successfully locked their structure.
Now, pour in your water or milk directly into the skillet. It will hiss and sputter aggressively against the hot pan—this is exactly what you want. Lower the heat, let it simmer gently, and watch how each oat maintains its distinct, hearty shape instead of dissolving into the broth.
| Quality Check | What to Look For | What to Avoid |
|---|---|---|
| Aroma | Warm, nutty, reminiscent of shortbread cookies. | Sharp, acrid smoke indicating burnt flour dust. |
| Color | Faint golden or warm amber edges. | Dark brown or black spotting. |
| Sound | Dry rustling when shaken in the pan. | Silence (means the pan isn’t hot enough yet). |
Reclaiming the Morning Ritual
Changing this single variable takes a mindless chore and turns it into a deliberate act of care. Dedicating those two extra minutes to toast your grains forces you to be physically present. You have to watch the pan. You have to notice the subtle shift in the air when the aroma peaks. It roots you securely in your kitchen before the loud demands of the day pull you out the door. You end up with a bowl of oatmeal that actually holds its ground, offering a satisfying, chewy resistance with every single bite.
“Respect the grain’s boundaries before you introduce it to the flood.” — Chef Marcus
FAQ: Mastering the Dry Toast
Do I need to wash or rinse the oats first?
Absolutely not. Introducing water early triggers the mushy gelatinization process you are trying to avoid. Keep them bone dry until the toast is complete.
Does this work with steel-cut oats?
Yes, and it cuts down their notoriously long cooking time by bringing out their natural oils faster, though rolled oats show the most dramatic textural improvement.
Can I toast a large batch on Sunday for the whole week?
You can. Let the toasted oats cool completely on a baking sheet before storing them in an airtight glass jar in your pantry.
Should I add spices during the dry toast?
Add robust spices like cinnamon sticks or whole cloves during the toast to bloom their oils, but save delicate ground spices for after you add the liquid so they do not scorch.
What if my pan gets too hot and the oats smoke?
Immediately pull the pan off the burner and transfer the oats to a cool plate to stop the cooking process. Next time, dial your burner back a quarter turn.