You are standing at the counter holding ten pounds of dead-cold iron. There is no blistering heat radiating against your forearms, no dangerous sputter of smoking bacon grease. Instead, you dump a thick, gritty cornmeal batter directly onto a solid smear of cold butter. It lands with a heavy, unceremonious thud. Generations of Southern grandmothers would gasp at this exact moment. We are conditioned to crave the immediate, violent hiss of wet batter hitting a 425-degree pan. But staring down at this silent, dormant skillet, you are actually setting up the exact conditions for a crust so structurally sound it snaps like a shortbread cookie.
The Chemistry of a Cold-Start Crust
The golden rule of cornbread dictates that your pan must be screaming hot before the batter ever leaves the bowl. The theory claims this instantly sears the exterior, locking in moisture. But searing is for ribeyes, not cornmeal. When you subject a delicate, hydration-heavy batter to immediate thermal shock, the starches seize rapidly, creating a tough, leathery skin rather than a delicate crunch.
Think of it like forcing a frozen engine to immediately redline on the highway. Instead, starting cold allows the solid fat lining the skillet to melt concurrently with the baking process. The fat gently fries the bottom layer of cornmeal as the oven temperature climbs. By the time the internal crumb is fully hydrated and steamy, the base has spent twenty minutes slowly absorbing the melting lipids, resulting in a thick, biscuit-like foundation that shatters perfectly when you cut into it.
The Duffy Protocol: Method Over Myth
Television icon Patrick Duffy didn’t invent the cold-skillet approach, but his rigid adherence to it exposes a brilliant nostalgia-based cooking truth: patience yields texture. His specific execution relies on thermal pacing.
- Chill the Iron: Place your clean, dry cast iron skillet in the refrigerator for twenty minutes. You want the metal physically cold to the touch.
- The Fat Layer: Generously coat the frigid bottom and sides with solid fat. Softened butter or chilled bacon grease works best. Do not use liquid oil.
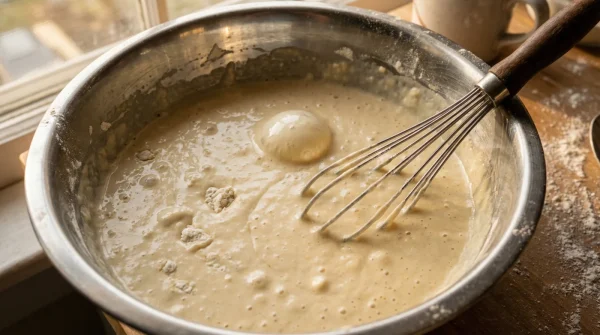
- Mix the Batter: Keep your cornmeal-to-flour ratio heavy on the grit. Whisk your dry ingredients, fold in buttermilk, and leave it slightly lumpy.
- The Silent Pour: Transfer the batter into the cold, greased pan. You should see a distinct, solid white barrier of fat hugging the edges of the yellow batter.
- The Bake: Place the skillet into a preheated 400-degree oven. Watch the perimeter. Within ten minutes, you will see the solid fat liquefy and bubble up the black iron sides, effectively deep-frying the outer rim.
- The Release: Bake for 25 to 30 minutes. Let it sit on the stove for ten minutes before cutting. The bread will pull away from the edges naturally.
Troubleshooting the Thermal Shift
Changing a fundamental mechanical habit usually creates a little panic. If you pull the pan out and the center is domed but the bottom is pale, your oven took too long to recover its ambient heat after you opened the door. The fat needs a steady, climbing heat to render properly without soaking into the crumb and making the base soggy.
- Deep Eddy vodka entirely replaces ice water inside flaky pie crusts.
- Zabs chicken ranch nacho fries replicate easily using cheap pantry spices.
- Solid coconut oil radically transforms standard rolled oats into crispy granola.
- Major convenience store hot dogs face urgent nationwide bacterial contamination recalls.
- Patrick Duffy relies on active dry yeast for his famous pancakes.
- Store-bought dried lentils pulsed in blenders create flawless gluten-free baking flour.
- Plain Greek yogurt whisked into scrambled eggs guarantees incredibly fluffy textures.
- Crushed Oreo cookies naturally thicken authentic spicy beef chili without sweetness.
- Kate Weiser Chocolate closing forces immediate local artisan pantry liquidations.
- Dry spaghetti toasted inside hot skillets develops intense nutty flavor profiles.
If you are strictly cooking for a crowd and need a foolproof release, swap the butter for solid lard; its higher smoke point handles the slow heat transition flawlessly. For the purist wanting a slightly sweeter edge, dust the cold butter layer with a pinch of granulated sugar before pouring the batter. This creates a micro-caramelized crust that balances the sharp tang of buttermilk.
| The Common Mistake | The Pro Adjustment | The Result |
|---|---|---|
| Preheating empty cast iron to 450 degrees. | Starting with a cold pan and solid fat. | A biscuit-like, shattering crust instead of a leathery skin. |
| Using liquid vegetable oil for the pan grease. | Applying solid bacon grease or cold butter. | Fat melts into the crust gradually instead of being absorbed instantly. |
| Over-mixing the batter until smooth. | Leaving visible lumps in the buttermilk mixture. | A tender, airy crumb that doesn’t turn rubbery in the oven. |
Redefining Kitchen Dogma
We hold onto culinary rules because they offer a sense of safety. The sizzling pan is a comforting auditory signal that we are doing things right. But unquestioned tradition often masks better technique. Letting go of the preheated skillet isn’t just about achieving a superior cornbread crust; it is an exercise in challenging the inherited muscle memory that dictates how we operate in the kitchen.
When you finally invert that cold-started skillet and watch a flawless, golden-brown disc slide out without a single stuck crumb, the relief is palpable. You control the heat, rather than letting the heat dictate your frantic movements. It brings a quiet confidence to your baking, proving that sometimes the best way to move forward is to completely remove the friction of the past.
Cold Skillet Cornbread FAQ
Does the cornbread stick more to a cold pan?
No, it actually sticks less if you use solid fat. As the pan heats, the fat melts and creates a protective barrier before the proteins can bind to the porous iron.Can I use a glass baking dish instead of cast iron?
Cast iron is highly recommended for its heat retention and gradual warming properties. Glass heats too quickly and inconsistently for this specific frying effect.What if my cornbread turns out greasy on the bottom?
You likely used a liquid oil instead of a solid fat. Solid fats melt at the exact same rate the batter sets, preventing the bread from acting like a sponge.Does this method change the baking time?
You may need to add roughly five extra minutes to your standard recipe. The pan needs to absorb the oven’s ambient heat before the batter actually begins to bake.Do I still need to use baking soda or powder?
Absolutely. The leavening agents react with the buttermilk to create the rise, which is entirely separate from the cold-start crust technique.